Installation/Removal Instructions
![](https://cdn.shopify.com/s/files/1/0267/9635/9855/files/Install1_22686e66-f8f5-4a2e-a8b7-422639c1cfe8_480x480.jpg?v=1658094447)
1. Align Wallwerx base with pegboard and depress plastic rivet heads until snapped securely in place.
2. Rivet heads are fully depressed.
![](https://cdn.shopify.com/s/files/1/0267/9635/9855/files/Install2_9e7d40ac-3935-453a-8c42-b080d37ef9d3_480x480.jpg?v=1658094550)
![](https://cdn.shopify.com/s/files/1/0267/9635/9855/files/Install3_480x480.jpg?v=1658092370)
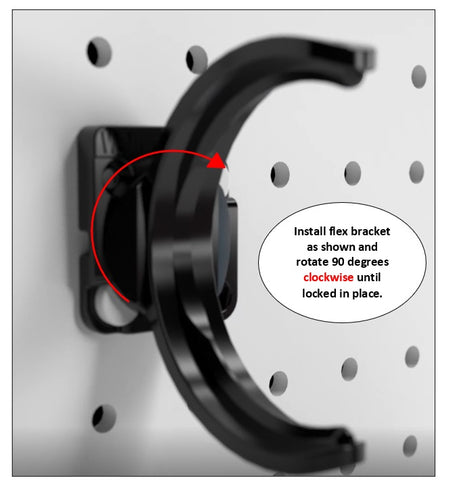
3. Install flex bracket as shown and rotate 90 degrees clockwise until locked in place.
4. Flex bracket locked in position and installation complete.
![](https://cdn.shopify.com/s/files/1/0267/9635/9855/files/Install4_b7cfcce1-aa4f-4a78-b6a2-672c3ecc2833_480x480.jpg?v=1658094049)
![](https://cdn.shopify.com/s/files/1/0267/9635/9855/files/Remove1_480x480.jpg?v=1658092491)
1. Remove flex bracket by rotating counterclockwise 90 degrees.
![](https://cdn.shopify.com/s/files/1/0267/9635/9855/files/Removal2_818c0635-28ae-40e3-a327-6c8f0db27de5_480x480.jpg?v=1658094678)
2. Remove Wallwerx base by inserting medium flat-blade screwdriver under both rivet heads and twisting to release.
3. Once both rivet heads have been released, the Wallwerx base can be removed from the pegboard.
![](https://cdn.shopify.com/s/files/1/0267/9635/9855/files/Removal3_5a07b7ee-19eb-487c-8d75-caaca0d8d8b0_480x480.jpg?v=1658094194)
![](https://cdn.shopify.com/s/files/1/0267/9635/9855/files/OtherSurfaces1_68c9ae35-4b5d-4b90-9d8d-f49f5a2f4b15_480x480.jpg?v=1658094769)
1. Remove both rivet assemblies
2. Use #6 deck screws or similar to secure Wallwerx base to other surfaces